Blog has moved, searching new blog...

This blog is now called Butcher, Baker has moved to: thebutcherthebaker.wordpress.com
Find all of these posts and much more over there.
Scroll down to see the post you're expecting!

Butcher, Baker

Showing posts with label bread. Show all posts

Saturday, November 28, 2009

Fresh from the oven - White Tin Loaf


Since baking my own bread I can't remember the last time I bought a sliced loaf. As much as I love all the artisan style bread I bake, sometimes only a traditional white tin loaf will do and shop-bought bread certainly doesn't cut the mustard for me any more. When I found out that this months Fresh from the Oven's host was going to be Linda from With Knife & Fork and she had chosen White Tin Loaf I was really pleased.

This recipe uses a different kneading method to what I'm used to and sometimes the urge to whack all the ingredients into the KitchenAid can be to much, but this time I stuck with it and was genuinely impressed with the results. When I initially read the kneading instructions I could see how it could work, but I was proven wrong.

It produced a loaf with amazing oven spring and the perfect texture and size for bacon cobs. Although it doesn't have the strong taste like some of my bread does this makes it great for simple sandwiches. Everyone once in a while wants a basic, comforting sarnie be the filling ham and pickle or cheese and tomato. Don't be put off by the long looking method. It is truly worth it.


The 1 tip I would give would be that 10 min before the end of baking turn the loaf upside down in the tin. This helps the bottom of the loaf to crusten up.

------

Dan Lepard says he developed this when he was working full time in commercial kitchens (that made artisan hand kneaded bread) because there wasn’t time for full 10 minute knead of all the different bread batches so he switched to short kneads spaced out and found it works just as well, part of the development of a good gluten structure is dependent on the time elapsed not the vigorous kneading. I liked the idea because I’d not been getting good textures with either a machine or a normal hand knead. I am now a wholesale convert.

Note:

You must use oil not flour on the kneading surface and your hands. Something like vegetable oil is good.

The dough must be quite sticky and soft to start with. It will firm up when kneaded and as time progresses.

Steps:

* Once you have soft sticky dough leave it covered in the bowl for 10 minutes.
* Now oil your kneading surface and hands and tip the dough out.
* Knead for about 12 seconds by folding in the edges to the centre, a bit like shaping a round loaf, rotate the dough as you go.
* Flip the dough over, leave it on the surface and cover with a cloth. Wash out the bowl and then oil it lightly. Put the dough back in the bowl and cover.
* Leave for 10-15 minutes and then do another 12 second knead. You will notice the dough is already less sticky and firmer.
* Leave for 20 -30 mins and repeat the fast knead. You are aiming to have kneaded the dough 3 times in the first hour.
* Leave covered to rise until at least 50% larger but not more than double in size.
* Tip out onto the oil surface and press the air out of the dough using the tips of your fingers so its square-ish in shape. Repeat the fast knead process (or fold in to thirds then rotate through 90, flatten again and fold into 3rds again).
* Shape the dough as required for the particular loaf you are making. Put it in a tin, or supported in a floured cloth in a bowl.
* Leave to rise until at least 50% larger and preferably almost double in size.
* Slash top and bake as per your recipe.

White Tin Loaf (based on Dan Lepard’s Quick White Loaf, p63 of the Handmade Loaf)

2lb loaf tin greased and floured or lined with baking parchment (no need to line the short ends just oil them).

Oven to be pre-heated to its maximum setting (R10/250C) and with a tray of water in the bottom to create steam.

Ingredients:

200g semi skimmed milk at room temp (Dan uses whole milk but semi skimmed seems to work fine)

150g water at room temp (remember 1g = 1ml but its easier to be accurate weighing fluids)

1 tsp fast action yeast (or 2 tsp fresh yeast crumbled)

200g plain white flour

300g strong white bread flour

1 ½ tsp fine sea salt

Method:

Mix the flours and salt together in a bowl.

Mix the water and milk together in a separate bowl and whisk in the yeast.

Add the liquid to the flour and mix with the fingers of one hand to a soft sticky rough dough. You may need to add a little more liquid do this a teaspoon at a time until you have a soft sticky dough.

Follow the kneading instructions above.

The first rise will probably take about an hour from the last knead.

To shape for a tin loaf, flatten the dough to a square about the same width as your tin. Roll the dough into a cylinder and press the seam firmly, fold under the two short ends and place in the tin seam side down.

Allow to rise (covered) to 1 ½ to 2 times volume i.e. to the top of the tin.

Slash the top of the loaf along it length and put it straight into the oven for 10 minutes at maximum temperature. After 10 minutes check how it’s browning and drop the temperature as follows (these baking guidelines are from the River Cottage Bread Book):

R6/200C if the crust is pale

R4/180C if crust is noticeably browning

R3/170C if crust is browning quickly

And cook for a further 40-50 minutes.

I usually check again part way through this time and either adjust temperature again or cover the top with foil if it’s brown enough. Also note that with a traditional gas oven (i.e. one without a fan) the top may brown far too quickly on the side near the heat at the initial temperature so you might want to start at a lower setting of R8/9 for the first 10 minutes. Adapt the setting for what you know about your oven and how things usually bake.

When it’s cooked turn it out of the tin and allow to cool.

Wednesday, October 28, 2009

Fresh from the oven - Beer Bread Bowls.


October's Fresh from the oven challenge was hosted by Corry. She recommended a fantastic recipe inspired by from Richard Bertinet’s fabulous book Dough – Simple Contemporary Bread

I tried this particular recipe last year, but keen to adapt recipe and in keeping with my sudden preoccupation of baking with beer, I wanted to try this recipe to make beer bread bowls, specifically to be served with scouse.

I use quite a bit of Sam Smiths beers in baking as their fruit beers give great taste to the likes of ice cream & brownies and their other beers have a strong defined taste that is perfect for stews and bread. The oatmeal stout I decided to use has a definite oaty aroma and I thought it would be perfect for bread.

This time the dough seemed to work better than my first attempt last year and they worked well. I now have ideas to make these bowls as a fruit bread then filling them with custard..mmmm..

Beer Bread Bowls
makes 6 16cm bowls

500g strong bread flour
20g course semolina
15g fresh yeast (or 5g fast action yeast)
10g salt
50g olive oil
320g beer
chilli or spice (optional for added flavour)

1) Preheat the oven to 250˚C (500˚F). Mix together the flour and semolina and rub in the yeast as if you were making a crumble (Richard Bertinet’s method – see below for video link). If using a mixer, switch it on to the slowest speed, add salt, olive oil and beer and mix for 2 minutes, then turn the speed up to the next lowest speed and mix for 6 to 7 minutes until the dough becomes smooth and elastic.

2) If you are kneading by hand, knead for approximately 10 to 12 minutes or until you have a nice smooth elastic ball of dough. Richard Bertinet has a unique kneading technique referred to as the French fold that can take approximately 5 to 10 minutes depending on practice. You can view his method in a online video at the Gourmet Webpage. In this video, he is actually doing sweet dough but the same technique can be used for most bread dough.

3) Place the dough into a bowl that has been floured, cover with a tea towel and leave in a draught free place for approximately 1 hour or until doubled in volume.

4) Lightly oil or spray with non-stick spray, the outside of 6 ovenproof bows (I used pyrex bowls). Turn the dough onto a lightly floured work surface and divide into 6 to 8 pieces (depending on the size of your baking bowls). Taking one piece of dough at a time and using a rolling pin, roll each piece into a circle (similar to making pizza). Shake off excess flour and shape each piece over an upturned bowl, patting into shape and pressing gently to remove air bubbles from between the dough and the bowl. Rest the dough for 10 minutes. Place the upturned bowls, two at a time, on a baking tray lined with parchment paper, then into the preheated oven. Turn the oven down to 200˚C (400˚F) and bake for 20 - 25 minutes. Remove from the oven and leave to cool for a few minutes. Using a fine-bladed knife, gently loosen the bread from the bowls and ease off. Cool on a wire rack.

It is probably safer to serve the bowls on a plate, as they do become soggy after a while and the soup may leak through.

Monday, September 28, 2009

Fresh from the oven - Stuffed Buns


This months Fresh from the oven challenge has been hosted by Ria where she proposed Stuffed Buns. I've never made stuffed buns before let alone eaten them, but I'm always up for a challenge!

The dough turned out very different to the type of dough I'm used to working with. The best way I can describe it would be of the texture (and weirdly the smell) of playdoh. I had to add more flour to get it to a kneading consistency. This extra flour may be down to me converting the recipe into grams incorrectly. I also mucked up the oil. Thinking Sunflower oil would the best as it is the lightest flavoured oil I had in the house, I had completely forgotten until I poured the oil in that I had used this oil for frying fish a while back and filtered the unused oil back into the bottle giving the dough a slight eau d'fish-and-chip-shop. Thankfully once the buns were cooked you couldn't smell or taste the oil. I chose to make the buns with a curried paneer filling which was very tasty.


Given all the stumbling blocks I had with this dough the buns worked well. Hubby and his workmates raved about them. They have requested some more soon.

Stuffed Buns
makes 12 buns

For the dough:

3g fast action yeast
125ml milk
Salt to taste
125ml oil
250g plain flour
60g sugar
1 egg, beaten
1 egg white, for egg wash
Nigella seeds (Kalonji) for sprinkling
Method

1) Boil the milk and allow to cool down till it is warm to touch. Add sugar, oil and salt. Mix well with a wooden spoon till the sugar dissolves and add 1 cup flour and mix to a smooth paste.

2) Add the beaten egg, yeast and mix. Add the remaining flour and mix well till it forms a smooth dough. Knead well for 10 mins. Let it rest till it doubles in volume.

3) Punch down the dough lightly using your palm and divide them equally. Flatten them into small discs and fill them with 1 tbsp of the filling. Re-shape them into a ball. Sprinkle the top with Nigella seeds. Let it prove for another 20 mins.

4) Bake them in a pre-heated oven at 200 degrees for 10 mins. When it starts to brown, give them an egg wash using 1 slightly beaten egg white.

Spicy paneer filling

200g paneer
4 Onions, finely chopped
1 tbsp garlic paste
1/2 tsp ground ginger
1/2 tsp chilli powder
1 tsp garam masala
Salt to taste
3 tbsp oil

1) Heat oil, add the garlic paste and saute till it gives out a nice aroma. Add the onions. Saute them till soft and transparent. Reduce the heat and add the groud spices and mix well for 2 mins.

2) Add the paneer and mix well. Take it off the heat and allow to cool before filling the buns.

Saturday, September 19, 2009

Black Sheep Bread


This bread is in honour of the Yorkshire 3-Peaks Challenge Hubby & I completed last weekend. Thanks to everyone who sponsored us. We stayed at Pinecroft and it was somewhere I would highly recommend. We're thinking of returning with friends later on in the year.

It was a great experience and provided great memories from the bog jumping, being knee deep in mud, weird tasting watermelon jelly sweets, a sneaky pub stop and sunset at the top of Ingleborough. During the walk I gained the nicknames of Speedy Gonzales. Once I got going, there was no stopping me. This may have been due to a heady mix of ibuprofen, Lucozade, Jelly Babies & adrenaline. I'm really proud of myself & Hubby for completing it minus any injury, blister ache or pain (ooh get me!) and the training I did over the summer really paid off. Although it took us far longer than expected to complete due to an incident involving the Mountain Rescue Team 1 mile from the end (let's just say thank goodness for the training I did as part of my DofE Gold Expedition), some of us are planning to return next year to do it in around 10 hours. Others however have been put up hill walking for life! In a slightly crazy way I got a serious kick from the challenge and found it easier than I was expecting. Even after 25miles I could have continued, as someone has pointed out there is room for a female Eddie Izzard!


The reason for this bread being a tribute to our walk is that one member of the team (not me I hasten to add)sneaked in a cheeky half-pint at the Old Hill Inn - a fab pub between Whernside & Ingleborough belonging to the famous Black Sheep Brewery. Apparently this cheeky half-pint was one of the best drinks he has ever had and it provided some comedy moments for the rest of the team as it went straight to his head, he started to talk about how pretty all the trees were and I swear at one point he began to skip up Ingleborough. I've never baked bread with beer in it before, but have declared this bread to be a resounding success. It produces a beautiful fluffy bread with a slightly golden crumb. You can certainly taste a hint of ale in the bread. It's given me some ideas for some other bread that I've going to keep under wraps for now. This is also the first time I've used my new brotform and grignette and am really pleased how well they have worked.


Now, the after effect of endurance exercise is that it does 2 things to your appetite. Either you can't eat enough or your appetite is zapped. Now you would think when burning 9000 calories in 16 hours we would both have raging hunger...nope. Our appetite was completely killed and a week on it's only just getting back on track, hence why it has been so long since I've blogged. Normal service will now resume on my blog with both Hubby & I having lots of great foodie projects up our sleeves. So here's to carbs, the great outdoors and friends. Cheers!

Black Sheep Bread
Makes 1 large loaf

500g strong white bread flour
10g salt
5g fast action yeast.
300ml Black Sheep Riggwelter Ale (yes I know it's sacrilegious, but it needs to be warm)

1) Mix together all the ingredients until you have a rough dough. Knead either by hand or with a mixer for 10 min until you have a beautiful, silky dough. Shape into a round and leave to rise in a covered bowl for 1-2 hours, or until it has doubled in size.

2) Knock back the dough, shape into chosen shape and place in/on tin or brotform and leave again covered in a plastic bag until it has doubled in size. If cooking on a baking sheet cover in polenta/course semolina before placing the bread on as this stops the bread sticking to the sheet.

3) Preheat the oven as hot as it will go. At the bottom of the oven place a baking tin of boiling water (this helps to develop the crust). If using a brotform turn bread out onto tray. If not using a brotform place the dough in/on chosen tin. Slash the top of the loaf (optional) then bake for 10 min.

4) Turn down the oven to 200oc and bake for a further 20-30 minutes. When the bread is ready the bottom of the loaf sounds hollow when tapped. Allow to cool on a wire rack.

Tuesday, July 28, 2009

Fresh from the oven - Tomato & Garlic Focaccia


This months challenge from Fresh from the oven is to make a Focaccia using which ever recipe we wanted to. Focaccia is becoming a staple in this house. I probably make some version of focaccia more than any other type of bread. It's perfect for barbecues or when we have people over to dinner because it is easy to share.

I made this variant for my Birthday BBQ and it went down very well. The tomatoes give it a nice change in texture and sweetness. The only slight alteration I would make next time would be to add the garlic to the dough as it caught a bit on top when added to the oil.

Tomato & Garlic Focaccia
Makes 1 large foccacia
Based on a recipe from River Cottage - Bread

500g strong white bread flour
5g fast action yeast
10g fine salt
325ml warm water (mix 100ml boiling water with 225ml of cold water)
1 tbsp olive oil (for the dough)
2 tbsp olive oil mixed with 2 minced garlic cloves (for the topping)
rosemary
10 cherry tomatoes, halved
flaky sea salt

1) Mix together the flour, yeast, salt and water. Once the ingredients are combined add the olive oil. Knead for around 10 min until the dough is smooth and silky. At the stage, if using a mixer, the bowl should be clean of dough.

2) Shape the dough into a round and leave to rise in a covered and greased bowl until it has nearly doubled in size.

3) Tip the dough out and work in a rough rectangle shape then place in an oiled baking tray. Cover and allow to rise for 20 min.

4) Preheat the oven to 250oc (or as high as it will go). When the bread has had its half hour rise prod it with your fingers to get the cratered texture then push the tomato halves into the dough. Drizzle with the garlicky olive oil then sprinkle with salt & rosemary.

5) Bake for 10 min then bake for a further 10min at 200oc. Leave to cool on a wire rack for around 10 min before serving.

Sunday, June 28, 2009

Fresh from the oven - Rustic Loaf


At the end of last month via UKFBA Claire introduced me to a new baking group called Fresh from the oven. As I'm a keen baker, I was keen to join the group to help improve my skills. This months challenge was hosted by Brianna. She chose a Rustic Loaf recipe from from Jeffrey Hamelman's Bread: A Baker's Book of Techniques and Recipes. The idea behind the recipe was that it was a good, basic recipe that introduced a simple preferment, minimalist ingredients, and let us practice our shaping techniques.

I learnt all about preferment at River Cottage, though it was called the sponge dough method at RC. I've been keen to use the method and decided to set time to do it. It's by no mean the quickest loaf I have ever made, but my goodness did it taste good. The addition of wholewheat also made it filling. The preferment gives a very slightly sour taste, not too unlike sourdough.

Initially the dough was very wet and too difficult to work with so had to add some more flour (this may be due to me making a dodgy conversion with the measurements from cups to g/ml). I also have to admit I didn't let it prove for as long as the recipe said as 1) I was running out of time and 2) it was rising quite rapidly thanks to the hot, humid weather and I was worried about over proving the dough. Looking at the crumb of the dough the big air pockets are a sign that is was beginning to over prove so I caught it at about the right time.

I need to get better at making a tighter shape and have asked for some proving baskets for my birthday. What you can't see on the photo is that in both of the loaves Hubby & I made they burst a bit on one side due to how we shaped it and supported the dough during proving. Although I was initially unsure of the recipe I'm really happy with the loaf I managed to produce and will certainly be using this method again.

The full recipe for the loaf can be found on The Fresh Loaf.


Saturday, April 04, 2009

Focaccia


Back in February I made focaccia, to accompany Snow day soup, successfully for the first time. Then later on in February I attended a course with Dan Stevens & Aiden Chapman at River Cottage to learn the art of bread making. Between Hubby & I we made so much bread on the course, which was stashed in the freezer, it is only now I've really been able to put the skills I learnt at River Cottage into practice. One of the biggest things I learnt on the course was that I was relying on my mixer to do all the work and not kneading the dough for long enough.

While down at River Cottage we popped to The Town Mill, Lyme Regis, a water-powered flour mill. There we were able to purchase some wholemeal flour that had been ground of the premises using the old grinding stones. The organic grain for grinding came from Tamarisk Farm

I've been waiting for us to finish our bread stash so I could try out this flour. I wasn't brave enough to make a loaf with 100% wholemeal so to make the focaccia I used 3/4 strong bread flour and 1/4 of this Town Mill flour. Like usual the the foccacia baked really well and the Town Mill flour certainly gave depth to the flavour.

Another ingredient I've also discovered recently is Maldon's flakey Sea Salt. I'd seen it before in shops, but couldn't see how and expensive salt could be so significantly different to 'normal' salt. Back in the new year while eating at friends she had used it on her cooking, then I suddenly understood why it is so good. I now use it on focaccia and a few other things. You only need a small amount of it so it lasts a long time.

Like all bread baking I do I'll be submitting this to the wonderful & inspiring yeastspotting.


Focaccia
Makes 1 large foccacia
From River Cottage - Bread

500g strong white bread flour
5g fast action yeast
10g fine salt
325ml warm water (mix 100ml boiling water with 225ml of cold water)
1 tbsp olive oil
rosemary
flaky sea salt

1) Mix together the flour, yeast, salt and water. Once the ingredients are combined add the olive oil. Knead for around 10 min until the dough is smooth and silky. At the stage, if using a mixer, the bowl should be clean of dough.

2) Shape the dough into a round and leave to rise in a covered and greased bowl until it has nearly doubled in size.

3) Tip the dough out and work in a rough rectangle shape then place in an oiled baking tray. Cover and allow to rise for 20 min.

4) Preheat the oven to 250oc (or as high as it will go). When the bread has had its half hour rise prod it with your fingers to get the cratered texture, drizzle generously with olive oil then sprinkle with salt & rosemary.

5) Bake for 10 min then bake for a further 10min at 200oc. Leave to cool on a wire rack for around 10 min before serving.

Wednesday, February 18, 2009

River Cottage Adventure - part 2

Sunday morning we awoke still full from the Valentine Feast and headed into Lyme Regis. Okay that is a slight lie we originally went somewhere else, but it was so dire we headed back to Lyme Regis.


After eating the essential fish & chips along the sea front, while dodging nose-diving seagulls, we decided to find The Town Mill Bakery where our Bread Making course would start on the Monday. Well what a gem. With two long benches and feel-good music pumping from the stereo we picked up a slab of wood and helped ourselves to the glorious cakes; cups of tea were then served at the table. Their brownies are one of the best I've ever tasted. I could have happily spent all day here drinking, eating and reading the cookbooks that adorn the bookshelves. If I was to run a bakery it would be exactly like this.

For the last 2 nights of our trip we stayed at Hedgehog Corner, a B&B just down the road from RCHQ. Joy, the owner of the B&B, was a fantastic host and had thought of everything down to the salt & vinegar for your fish and chips to the torch and high-vis jacket for the walk to the pub. She also cooked a great breakfast and is very passionate about where the ingredients come from. More or less all of the ingredients were locally sourced. I can highly recommend her muesli.


Monday morning we were back to Lyme Regis for 8.30 start at Town Mill Bakery. As we arrived we were met by Steve Lamb who recognised Hubby from Pig in a Day. In total there were 18 of us on the course and while waiting for everyone to arrived we tucked into tea and toast.


The first part of the course was with Aidan Chapman, passionate Master Baker who let us in to some of his baking secrets and the philosophy behind bread making. I found him incredibly inspiring. He also explained the the Chorleywood Process and how supermarket bread is by no means "real" bread. He then demonstrated the sponge & dough method where less yeast and salt used. He also uses wheatgerm in the majority of his bread for depth of flavour and texture. We then had a small masterclass on kneading 1 handed (so you can do 2 loaves at a time) & shaping bread. It took me a while to master the technique but by the afternoon I had it down to a fine are, Hubby was certainly the teacher's pet when it came to this! Aidan also explained how steam and how you slash the bread and significantly change a loaf. The longer and cleaner the slash the better. When putting my loaf into the giant industrial oven I was a bit over enthusiastic and sent my loaf straight to the back of the oven. I needed a bit of help to get it back out again! After our loaves were baked we headed in car convoy to RCHQ for the second half of the course. This was also to allow The Town Mill Bakery to open for customers.


The next part of the course was being lead by Dan Stevens, who had been head chef at the Valentine Feast. The afternoon started with us making our own bread dough. Like usual I made an absolute mess, but in turn produced great bread dough. Dan showed us another method of kneading. We left the dough to rise while Dan explained different doughs and demonstrated how 1 basic dough mix could make lots of different types of bread including flat breads, foccacia and English muffins. The flat breads he made were divine with the beetroot hummus. I could have easily swiped it all up and sat in a corner eating it. Interestingly he said the bread he couldn't master was naan bread. He concluded that the only way you can get naan bread as delicious as from the takeaway was to have a tandoori oven. What was interesting was that both Aidan & Dan recommended stones for cooking your bread on as it keeps it's heat the best.


Before lunch we all prepared a foccacia from the dough Dan had prepared earlier then set about making some pizzas for lunch. Then cooked them in the woodfired oven. The weather was so glorious we did this part of the day outside. The oven was so hot they cooked in less than 90 seconds and tasted so good. To accompany the pizza we also had some ham & purple sprouting broccoli gratin.

After lunch Dan explained the theory behind sourdough and how to make our own. I'm very intrigued by this bread and am planning to start a "mother" this weekend. While our final loaf was baking in the woodfired oven we wondered around the grounds. How I would love to own somewhere like River Cottage. We eventually left with 6 loaves of bread we had cooked between the 2 of us. Thank goodness for freezers!


I'm very thankful for Hubby taking me away to River Cottage to not only experience the Valentine Feast but to learn so much on the bread course. I picked up so many tips and hope I can implement them into my baking. In turn I should produce even better bread. It has made me think completely differently about how I bake. What I did notice on the course that I was probably one of the more experienced in baking there and saying that I still think I have a great deal to learn. I put it down to my food geekyness! The course certainly wasn't for bread beginners but keen home bakers and was the perfect way for expanding my knowledge. I would love to return for another course.

Tuesday, February 03, 2009

Snow Day Soup & Frolics.


Since Sunday afternoon it's been snowing and snowing...and snowing. Not the usual grey mushy stuff we have here in the UK but bona fide snowy powder, perfect for snowman making. Much excitement ensues when you work in Education as there is a possibility school will be closed and it will be officially declared a Snow Day. To be honest by 4am on Monday morning while watching Hubby slide up the drive for a days work in Brum (& consequently being stopped by the police and being told he was mad to drive to Brum) I decided I wasn't going to work. The idea of sliding down the lanes filled me with fear. Instead I settled down to a day in the house. Not only Monday but today, Tuesday, was also declared Snow Day.

As I've mentioned before, the residents of this little row of cottages come out in force when something is cracking off. Be it floods, powercuts or being snowed in we come together and sort the problem out then recover with a cup of tea...even if it is made on the BBQ during powercuts. Most of us were up and about today and yesterday clearing the snow along the private road we all live off. As it is a private road and doesn't belong to any of us in the row (ah good old ancient boundary issues) it isn't gritted, so after having to push each others cars up the road while sliding all over the place we decided some sandbags had to be sacrificed.


The novelty of being stuck in the house soon wears off and with the snow outside I was itching to don the crampons and get out onto the hills. Not the cleverest idea considering I would be on my own so instead pulled on my funky wellies and a multitude of layers and headed up and out of the village. I really enjoyed my walk. The land looked so beautiful and peaceful blanketed in snow.


Mr Robin, the crazy thing, has been entertaining me (come on, he's far better than Loose Women!) and kept dancing behind the suet feeder as I tried to get his photo. This is the same robin who sometimes likes to hop/dance back and forth across the garden step while singing at the top of his voice. I usually hear him before I see him. He does have a lady friend, but I haven't seen her in a while.

Today we have no milk, but main thing is I still have cream for my coffee and a few Raspberry Brownies to keep me company. It's a bit of a hike to the nearest shop and it's down country lanes. Hubby only got out of the drive this morning by me and the other neighbors pushing him. In my little car, there isn't a chance of me getting out. I've taken the advantage to being snowed in by doing quite a bit of cooking.


A week ago I received my signed copy of River Cottage Handbook: Bread. Since starting to make bread last year I've become more interested in the science behind bread and what makes it work. I'm really impressed with the book and is full of great advice, without being patronising like some books can be. I'll be meeting Daniel Stevens himself on a bread making course in a few weeks time. I made focaccia a few summers ago and it was dire, however by following Daniel's recipe and advice I think I have just produced the best piece of bread I have ever baked. The bread was so good I had to go back for more. I've decided Dan is my new hero!

To accompany the bread I made some Snow Day Soup using the veg I could find languishing in the fridge. I don't really have a recipe for this but essentially gather all the veg you can find (in my case carrots, leeks and a small potato), gently fry off the leeks. Throw in a clove of garlic, the rest of the veg, a bay leaf and 800ml of veg stock. Simmer for 30 min then blitz in the blender.

Tuesday, December 16, 2008

Chocolate Stollen


As I've mentioned before, some of my childhood was spent living in Germany and I have very fond memories of celebrating Christmas there. During the last few years German Christmas Markets have been springing up in cities over here in the UK. Nothing like the Christkindlmarkets in Berlin, but it's a good start. The biggest Christmas markets here take place in Leeds and Birmingham. We visited the Birmingham market Saturday evening and it was heaving. Unfortunately I was so enthralled with the whole experience I forgot to take photos.

While there we there we ate kartoffelpuffen with apple sauce, kirschkuchen and pretzels. I was boring Hubby with all my explanations for the different foods and getting overexcited every time I saw something I hadn't seen in years. I would have had Glühwein but Hubby was driving and I felt a bit guilty drinking again when he was driving. To make up for it the following night we drank mulled cider while putting up the Christmas tree.

One of the popular German Christmas bakes is Stollen, a yeasty fruit and marzipan bread and I've been told it represents a swaddled baby Jesus. I would go as far to say I prefer it to Christmas Cake. When I came across this recipe for Chocolate Stollen, although not traditional, I knew I had to make it. A few years back I made a traditional stollen using a slightly different method which worked well, but not as good as this chocolate version. Technically this was one of the most demanding cakes I've made. It also turned out to be one of the most impressive and tasty cakes I have ever made. Nigella would be proud. I'll be submitting it to Yeastspotting. Now take a deep breath and prepare for possibly one of the longest recipes I have ever posted.

Chocolate Stollen

Green & Blacks Chocolate Recipes

FOR THE DOUGH
100g mixed fruit
60ml dark rum
zest and juice of 1 orange
50g glace cherries, quartered
100g (1 bar) G&B Maya Gold chocolate (or decent dark chocolate), finely chopped
375g strong white bread flour
25g cocoa powder
1/4 tsp salt
1/2 tsp nutmeg, grated
1 tsp mixed spice
2 tsp dried active yeast (not the fast action kind)
150ml milk
125g butter
50g golden caster sugar
2 eggs

MARZIPAN
100g ground almonds
75g icing sugar
25g cocoa powder
a few drops of almond essence (optional)

FOR DUSTING
40g icing sugar
25g cocoa powder

1) Overnight soak the mixed fruit in orange juice, zest and 30ml of the rum. When you are ready to make the stollen stir in the glace cherries and chocolate.

2) Melt together the milk, sugar and 75g of the butter butter. Leave to cool then beat one egg plus one egg yolk into the milky mix. Keep the spare egg white until later.

3) In a large bowl add the flour, cocoa, salt, nutmeg, mixed spice and the yeast then gently pour in the milk and mix until you have a smooth dough. Knead lightly then place in bowl, cover with clingfilm and leave to rise for 30 min. While waiting for the dough to rise make the marzipan, line the 30x20cm baking tray with greaseproof paper and preheat the oven to 190oc.

4) To make the marzipan mix together the icing sugar, cocoa, ground almonds and the egg you saved from earlier (I love very almondy marzipan so also add a few drops of almond essence). Knead until you get a soft, pliable ball.

5) Melt together the remaining 50g butter and 30ml of rum. On a lightly floured board knead the dough then roll out into an oblong shape about 5mm thick (something I'm not very good at!). Brush with the melted butter and rum.

6) Turn the dough so you have a long oblong (rather than a wide oblong) in front of you. On the top cover 2/3 of the dough with half of the mixed fruit mix. Fold the bottom 1/3 two thirds the way up the oblong, then fold down the top third over it. Much like when you fold a letter for an envelope. Press down the open edges to help seal it.

7) Turn the dough 90 degrees clockwise (a quarter turn). Roll out to an oblong shape again. Brush with the butter and rum then repeat step 6 with the remaining fruit.


8 ) Mould the marzipan into an oblong shape just slightly smaller in length than the dough and half the width. Place the marzipan down the centre of the dough, fold the two sides of dough in to meet one another and place join side down in the lined tin. Brush the top with the butter and rum and bake for 35 minutes.

9) As soon as the stollen is baked, brush with the butter and rum (you may need to reheat the butter & rum it to regain the liquid consistency)and dust with loads of icing sugar and cocoa.

Monday, November 17, 2008

Beef & Butterbean Stew in a Bread Bowl


It seems to be taking me ages to write this post, things are all over the place at the moment. My friend has given birth to twin girls, work has been mad and I've got a stinking cold, which in turn kills my appetite. I have however made Hubby's year by getting him a ticket to meet Hugh Fearnley-Whittingstall and take part in the Pig in a Day course held at River Cottage HQ. This is preparation for the half a pig my smallholding friend is giving us after Christmas. Hubby, bless him, is so excited!

The inspiration for this dish came from the Dough cookbook Hubby had borrowed off a friend and thought a stew from this months Fresh magazine would be perfect in them. I admit I'm not a huge fan of stews as I find them boring, but this one was different. I made a double batch of the stew so we also had some the next day. The stew tasted even better the day after as the flavours had matured. I never thought I would say this but I would have this stew again.

The bread bowls worked better than expected, however next time I would grease the bowl better or use greaseproof paper to stop the bread sticking. It's been nearly 2 months now since I've been making all of our bread at home and I never thought there would be such a significant difference when I came to taste mass produced bread again. At the weekend we were away and I had some supermarket french baguette, it tasted so sweet and a fluffy nothingness compared to the bread I make at home. My homemade bread is far more filling and tastier!

Bread Bowls
Makes 2 bowls
Adapted from Dough: Simple Contemporary Bread

250g strong bread flour
10g polenta
1 tsp dried yeast
pinch of sugar
1 tsp salt
25g olive oil
320g warm water

1) Activate the yeast in warm water and sugar. Leave for 15 min to froth. Stir the olive oil into the yeasty mix.

2) Mix together flour, polenta and salt then gradually add the yeasty water to make a dough. Kneed for 10 min by hand or 2 min by mixer. Allow to rise for 30 minutes.

3) Lightly oil the outside of 2 ovenproof bowls. Divide dough in half and roll into balls. Roll out each piece of dough into a circle 3-5mm thick. Shape ontop on the upturned bowls and press down to rid of air bubbles. Rest for 10 min.

4) Bake bowls at 200oc for 20-25 min until the bread bowls are golden. Allow to cool for a few minutes before carefully removing the bread from the bowls

Beef & Butterbean Stew
Serves 4
Adapted from Fresh Magazine

2 tbsp olive oil
750g stewing steak
1 onion, finely sliced
1 red pepper, sliced
2 garlic cloves, minced
1 tbsp paprika
2 tbsp hot smoked paprika
125ml red wine
1 tin of chopped tomatoes
1 tin of butter beans
2 tbsp parsley, chopped
salt & pepper

1) In a deep casserole dish brown the stewing steak in the oil. Remove from the pan, set aside and fry onions and peppers in pan until softened.

2) Add the rest of the rest of the ingredients (apart from parsley & butterbeans) and simmer on a low heat for 3 - 3.5 hours, until beef begins to fall apart.

3) Stir in butterbeans and parsley then simmer for a further 5 minutes.

Wednesday, October 08, 2008

Herby Stuffed Crust Pizza


The manic week from hell is over. The dreaded Ofsted paid us a visit. Thankfully the weather and kids behaved themselves (ask any teacher and they'll tell you kids go loopy when it's windy) and we did well. The Head, governors and LA thanked us today by treating us staff to a tonne of cream cakes, chocolate & what seemed to be the worlds biggest fruit bowl. By the end of the day a huge dent had been made in the cream cakes (well they did HAVE to be eaten!) and the fruit...well it can wait another day.

After a few months of feeling really uncertain in my job my boss has given me an offer I can't refuse. My science background and quite frankly, food-geekyness has impressed her so much she's asked if I'll help lead the Healthy Schools initiative. Healthy Schools is all about promoting the health and well-being of its pupils and staff through healthy lifestyle choices. I have a little troupe of 9-11 year old grow-your-own wannabes and after half term will be launching a parents & child cookery club, Jamie O eat your heart out. We'll ignore the cream cakes and chocolate in the staffroom, they are a well earned treat!

Tonight I wanted a quick and easy tea, plus we had quite a bit of stuff needing to be used up. I'm also thinking about making pizza in one of the first cookery classes. Initially it wasn't meant to be stuffed crust, but Hubby rolled the dough out a bit too big and it wouldn't fit on the baking tray so folded the edges over on top of some of the cheese. Well if Pizza Hut...sorry Pasta Hut can stuff their crusts, so can I.

Herby Stuffed Crust Pizza
Serves 2 very hungry people or 4 with a side

Base
500g strong white bread flour
2 tsp salt
2 tsp of yeast (or 1 sachet of fast-action yeast)
2 tbsp olive oil
2 tsp sugar
300ml warm water ( 1/3 freshly boiled, 2/3 cold water)
1 tbsp mixed herbs

Sauce
1 can (400g) chopped tomatoes
2 garlic cloves, minced
1 tbsp olive oil
pinch of sugar

Topping

1 block pizza mozzarella (you can use any cheese you want)
any other toppings you want!
olive oil
basil leaves (optional)

If you are NOT using fast-action yeast prepare yeast with the warm water & sugar and leave for 15 min to froth.

1) Mix together flour, salt, herbs and fast-action yeast (if using).

2) Stir olive oil into the warm water/sugar mix. Pour the liquid slowly into the flour, stirring constantly until well combined. It should form together to make a soft, slightly sticky dough.

3) Knead dough on a floured surface for 10 min. If using a mixer, use dough hook and knead for 2 min. Place in a lightly oiled bowl, cover and leave to prove in a warm, draft-less place for 2 hours (or until dough has doubled in size).

4) In a small saucepan simmer all of the sauce ingredients for 10-15 min until you have a thick sauce.

5) Preheat oven and the biggest baking tray you can find to 250oc (or the hottest your oven will go). Roll out the dough and place on the hot baking tray. Place a row of cheese about an inch in from the edge of the dough. Fold the dough over the cheese.

6)Spread the sauce evenly over the dough base then sprinkle over the cheese and any other topping you want. Drizzle with olive oil. Bake for 8-10, until crust is golden brown and cheese is bubbling.

Saturday, September 13, 2008

Pea, Mint & Feta Soup and English Muffins


The last week has been chaotic as usual. Earlier in the week there was big concern about our cottage being flooded. The local river was at serious risk of bursting it's banks and the local geography means that when it rains (a lot) the run-off from the fields behind us flow down to one of the village ponds, which in turn bursts and flows straight past our front door. I knew it wasn't a good sign when I returned from work to find all the front doors in the row piled high with sandbags. Thankfully the pond stayed intact and our house is still dry. It still gave us a worrying few days though!

My interest in bread making is still strong and today was the turn of trying English muffins. I love them lightly toasted then slathered in butter. Very much comfort food. The soup season is just around the corner and I got the idea for this soup from a Mark Sargent soup recipe. I was pleased how this soup worked out. It is perfect and warming, but still with the taste of summer and perfect with a couple of muffins. Like most of my bread baking keep an eyeout for it on Yeastspotting.

Pea, Mint & Feta Soup
Serves 1

100ml water
110ml milk
1 tbsp chopped mint
150g frozen peas
10 cubes of feta
salt and freshly ground black pepper
drizzle olive oil

1) Bring water, milk and mint to the boil. Add peas and boil for 3 min until peas are cooked.

2) Drain most of the milky stock into a jug. Add feta to the peas and puree. Gradually add stock until you have the desired consistency. Serve with a drizzle of olive oil.


English Muffins
Makes 8

110ml milk
25ml water
1 tsp dried yeast
large pinch of sugar
225g strong white flour
pinch of salt
polenta for dusting

1) Heat milk, water and sugar into a saucepan until hand hot. Stir in yeast and leave for 15 min to allow a froth to develop on the top.

2) In a large bowl pour yeast mix into flour & polenta and mix until you have a dough. Knead dough for 2 min in mixer (10 min by hand)until you have a soft elastic dough. Place in an oiled bowl and cover with clingfilm. Leave in a warm place to rise for an hour.

3) Knock back dough then roll out until about 1cm thick. Using and 8cm cutter (or large wine glass!) cut out rounds and place on a baking sheet that has been sprinkled with a small amount of polenta. Once all of the rounds have been cut dust the top of the dough with more polenta. Cover with a tea towel and leave in a warm place for 30 min.

4) Heat a heavy based frying pan to low/med. If not using a non-stick pan melt a small amount of butter in the pan. Cook the muffins in batches for 7 min each side. While cooking the rest of the muffins place the cooked muffins under a tea towel to keep warm. If you can, leave for 5-10 min before slathering in butter and eating.

Wednesday, August 27, 2008

Perfect Pita Pockets


After a stressful day back at school (& the kids are not even back yet!) I have to admit when I got home the last thing I wanted to do was cook dinner. I could have happily slobbed on the sofa with a takeaway, but I made myself go to the kitchen and prepare dinner as I find cooking therapeutic and soothing for the soul. When I'm cooking I get lost in my own little world and forget my worries. Recently I've also putting music on while in the kitchen and today was the turn of Mr Tennant...well not literally (I wish!)...but music from the last episode of Dr Who. There is something about this piece of music that makes me smile.

One of the best stress relieving recipes is bread making. Even when I use the KitchenAid to knead the dough I like watching the ingredients combine and transform to a lovely soft dough. Tonight some serious therapeutic bread making was called for, so out came my recipe for pita bread to accompany the veggie bean burgers I was making.

I thought I loved pita bread from the shops until I made my own. I could easily eat it hot from the oven and slathered in butter. Hubby has the same love. After reading Bread Matters (a highly recommended, eye-opening read) I've become more determined to make more of less all of the bread we eat. This has to be one of the easiest bread recipes I know. I've submitted my pitas to YeastSpotting. They featured my Tiger Bread a few weeks back and it's becoming a regular haunt for me as it is great inspiration.

Pita bread
Makes 4 large pitas

150 ml warm water (50ml boiling, 100ml cold water)
1 tsp dried yeast
pinch of sugar
250g strong white bread flour
pinch of salt
15g butter, softened

1) In a jug mix warm water, yeast and sugar together. Leave for 15min for a froth to form on the top.

2) Preheat oven to 220oc. In a bowl mix together flour, salt and butter. Gradually stir in the yeasty water until you have a nice dough. Knead for 10 min by hand or 2 min in the mixer.

3) Split dough into 4 pieces and roll each into a sausage shape. Flatten each piece of dough with a rolling pin, until it is about 5mm thick. Place on a floured baking tray. Once all pieces of dough have been formed and placed on the baking tray, dust with flour and bake for 8-10 until puffed and golden.

Friday, August 22, 2008

The Science of Pretzels


Ever since living in Germany as a child I've loved pretzels. I remember going to cafe and seeing racks of them hanging there ready to be eaten. In the UK decent soft pretzels are hard to come by so on a wet, cold Thursday afternoon I decided to have a go at making my own.

Traditionally pretzels are bathed in a lye (sodium hydroxide) solution before being baked, this helps give them the chewy, darkened crust. My local chemist already looks at me suspiciously after I asked for saltpetre, so I decided to go for the safer option of a sodium bicarbonate solution (water and bicarbonate of soda).

Well they worked ok. They certainly had the right texture and taste, but lost their shape while being dipped. I think that may be due to the fact I'm still getting used to making dough in my KitchenAid and often find that dough comes out quite wet and springy.


I made 4 pretzels in total and dipped 3. It's clear in the photograph which have been dipped, the dark ones. The sodium bicarbonate solution is an base. When the pretezel is dipped in the solution and baked it causes the Maillard reaction to occur, which is similar to caramalisation. This in turn allows lots of new flavour compounds to be created, explaining why although pretzels are made with basic bread ingredients they taste very different to conventional bread. The dipped prezels have an almost green/yellow sheen that is more noticable on the underside. I assume this is something to do with the Maillard reaction.

Interestingly there is a big differece in taste and texture between the pretzels that had been dipped and not dipped. The dipped pretzels tasted really good, even if they did look ugly and the undipped pretzel tasted like a dry, chewy bread roll.

The recipe I used is based on a Alton Brown recipe, but I sized it down and converted it to grams.

Soft German Pretzels
Makes 4 large pretzels

190ml warm water (60ml of boiling + 130ml cold water)
1 1/2 tsp sugar
1 tsp salt
1/2 tsp active dry yeast
325g plain flour
25g unsalted butter, melted
1 1/4 litres of water
40g bicarbonate of soda
1 egg yolk beaten with 1 tbsp water
coarse sea salt

1) In a large bowl mix together warm water, sugar salt and yeast. Leave for 5 min and allow to foam. Into the large bowl add the flour and melted butter. Mix until you have a dough then knead for 5 min if you have a mixer or 10 min by hand.

2) Place dough into oiled bowl, cover and allow to rise in a warm place for 1-2 hours, or until the dough has doubled in size. (I have discovered my airing cupboard is the perfect place for rising dough)

3) Knock back the dough and cut into 4. Roll the dough into a long sausage shape then knot into a pretzel shape. Place on a baking sheet onto of oiled baking parchment.

4) In a large saucepan get the water and bicarbonate of soda onto a rolling boil. 1 by 1 place the pretzel into the boiling water and take out after 30 seconds. Place back on the baking tray. Brush pretzels with the beaten egg then sprinkle with salt.

5) Bake in a 230oc preheated oven for 12-15 min. Allow to cool on wire rack before eating. Ideally they need to be eaten the day they are made.

Tuesday, July 29, 2008

Cracking the tiger bread mystery


When we buy bread from the supermarket it's more often than not tiger bread. Some searching on the internet for a recipe appeared inconclusive and one forum where the recipe of tiger bread has been in hot discussion couldn't settle on a recipe. Because of this I decided to have a go at making my own using the little tips I had picked up. It was a bit of an experiment, but it worked really well. It did taste very like the tiger bread from the shops.

Rather than making a tin loaf I made a bloomer which spread out quite a bit leaving a loaf only a couple of inches thick. I think this was due to me making the dough a bit too wet. Saying this it still made a very good bread. The reason it is called a tiger loaf is because of the paste that is smothered on top of the bread. The paste is made from rice flour that doesn't contain gluten, so doesn't stretch like traditional bread dough and instead cracks producing a tiger stripe pattern. I inadvertently increased the cracked look while the bread was going through it's second rise. While it was rising a placed a piece of oiled cling film over the bread to protect it. When the rising time was over I peeled off the cling film and it produced a mottled effect.

I'm really enjoying this bread making!

Tiger Loaf
Makes 1 loaf

Bread
500g strong white bread flour
2 tsp salt
2 tsp of yeast (or 1 sachet of fast-action yeast)
2 tbsp sesame oil
1 tsp sugar
300ml warm water ( 1/3 freshly boiled, 2/3 cold water)

If you are NOT using fast-action yeast prepare yeast with the warm water & sugar and leave for 15 min to froth.

Tiger topping

1 1/2 tsp yeast
65ml warm water (you may need more)
1 tsp sugar
1 1/2 tsp sesame oil
60g rice flour

1) Mix together flour, salt and fast-action yeast (if using).

2) Stir sesame oil into the warm water/sugar (and yeast is not using fast-action) mix. Pour the liquid slowly into the flour, stirring constantly until well combined.

3) Knead dough on a floured surface for 10 min. If using a mixer, use dough hook and knead for 2 min. Shape dough into a bowl, place in a lightly oiled bowl and leave to prove in a warm, draft-less place for 2 hours (or until dough has doubled in size).

4) Mix together tiger paste ingredients and leave for 15 min. You may need to add a bit more warm water to loosen the paste.

5) Preheat oven to 240oc. Flatten the risen dough with your hand then knead for a further 30 seconds on a floured surface. Roll out into a fat sausage shape and place onto a greased baking sheet. Coat the surface of the bread with the tiger paste and leave to prove for a further 30 min.

5) Cook bread for 10 min at 240oc then turn the oven down to 200oc. Cook bread for a further 10 min. If you tap the base of the bread and it sounds hollow the bread is cooked. Leave to cool on a wire rack.

Saturday, July 19, 2008

The KitchenAid Christening - Basic White Bread


The plans for having a Birthday BBQ have been shot. The weather is terrible and Hubby is stuck in London. He's working on a project at the British Motor Show due to open in the next few days. He went down first thing Friday expecting to be there until about 3pm, well it's now 1pm Saturday and he's still there. The job hasn't gone as smoothly as they had hoped. When he eventually gets home I think it's going to be a very lazy tea of homemade pizza (what we were meant to have yesterday!) and a good bottle of wine.

After getting over the shock of being given a KitchenAid mixer by Hubby I set about trying to decide what to make with it. When they are sold in the UK, they don't come with a recipe book so it was going to be a bit of an experiment, though I did find some good tips on the internet.

Now, I love baking bread, but never seem to make it often. When I do make it I use the Fresh White Bread recipe from River Cottage Family Cookbook. I couldn't believe how fast and easy the KitchenAid made bread making. I left the dough inside the airing cupboard for a few hours while I popped to the shops. When I returned the dough had certainly doubled...all over the side of the bowl. Never before has my dough raised so much. I beat the dough down, shaped and left it to rest for a further 30 min, I could literally see the dough rise in front of my eyes! It produced a beautiful light and fluffy loaf albeit lopsided, but who cares. The hardest part was trying to leave it once it had cooked to allow the crust to harden. There is nothing better in the world than a slice of freshly cooked bread slathered in butter, heaven!

I've enjoyed the bread making experience so much I'm going to try and bake the majority of the bread we have now and can't wait for River Cottage to release their 3rd handbook all about bread.


Basic White Loaf
Makes 1 loaf

500g strong white bread flour
2 tsp salt
2 tsp of yeast (or 1 sachet of fast-action yeast)
2 tbsp olive oil
2 tsp sugar
300ml warm water ( 1/3 freshly boiled, 2/3 cold water)

If you are NOT using fast-action yeast prepare yeast with the warm water & sugar and leave for 15 min to froth.

1) Mix together flour, salt and fast-action yeast (if using).

2) Stir olive oil into the warm water/sugar mix. Pour the liquid slowly into the flour, stirring constantly until well combined. It should form together to make a soft, slightly sticky dough.

3) Knead dough on a floured surface for 10 min. If using a mixer, use dough hook and knead for 2 min. Shape dough into a bowl, place in a lightly oiled bowl and leave to prove in a warm, draft-less place for 2 hours (or until dough has doubled in size).

4) Preheat oven to 240oc. Flatten the risen dough with your hand then knead for a further 30 seconds on a floured surface. Roll out into a fat sausage shape and place in a lightly greased 2lb loaf tin or onto a greased baking sheet. Sprinkle with flour and leave to prove for a further 30 min.

5) Cook bread for 10 min at 240oc then turn the oven down to 200oc. Cook bread for a further 10 min. Carefully lift the loaf out of the tin, turn over and cook for another 5 min to allow the bottom of the loaf to brown. If you tap the base of the bread and it sounds hollow the bread is cooked. Leave to cool on a wire rack.

Monday, April 28, 2008

Cashew Chicken & Puris


Today in our house, Monday has been officially declared "Curry Monday", with the aim of me trying more or less every recipe in my new favourite Indian cookbook. What makes it even better is that all of the curries in the book can been made within 30 min, quicker than visiting the local Balti to pick up a takeaway! Usually I do a fancier rice like pulao rice to accompany curries, but as were tasting new curries I'm sticking to plain basmati rice for the time being so I don't overwhelm the flavours.

Tonight was Cashew Chicken's turn. The original recipes does use chicken thigh, but I'm a funny one when it comes to meat and don't like the texture of thigh meat (I told you I was odd!) and it also has quite a sizable amount of apricots in. You can add them if you want, but I prefer apricots in my granola rather than curry.

To go with the curry Hubby made some spiced Puris. Puris are puffed up deep-fried bread and are often used as the base of dishes like chicken chat. I left the puris in the capable hands of Hubby as I have a well known fear of frying. Not the healthiest, but goodness are they moreish. They had just enough chilli kick to complement the curry perfectly.


The curry turned out to be very similar to a lovely salty/sour curry I had a few weeks ago in a restaurant. Very delicious. I had to hide the portion I had put aside for my lunch tomorrow from Hubby as he was very tempted to scoff it. I'm sure if you added the apricots it would sweeten it.

Cashew Chicken
Serves 2

3 shallots, roughly chopped
2 tbsp tomato puree
30g cashew nuts
1 garlic clove
1 tsp garam masala
1/8 tsp turmeric
1 tsp sea salt
1 dsp lemon juice
1 dsp plain yogurt
3 tbsp fresh coriander leaves, chopped
2 chicken fillets, diced
150 ml chicken stock

1) Blitz the shallots, tomato puree, cashew nuts, garlic, turmeric, salt, lemon juice and yogurt until you have a smooth paste. In a pan fry off the paste for 2 min.

2) Add the chicken and coriander to the pan. Fry for a further 2-3 min. Pour in chicken stock. Cover and simmer for 10-12 minutes until chicken is cooked.

Spiced Puris
Makes 8

110g atta (chapatti) flour
1/2 tsp chilli powder
1/4 tsp turmeric
1/2 tsp ground cumin
1/2 tsp sea salt
1 tbsp water
sunflower oil for frying

1) Mix all the dry ingredients in a bowl. Gradually add the water until you have a soft, but not sticky dough. Knead until dough is smooth and elastic. Split dough into 8 balls, then roll out to make rounds about 3 inches across

2) Fill deep pan with about 2-3 inches of oil. Heat to 180oc (when a cube of bread browns in 30 sec). Cook puris in small batches. After a few seconds of being in the oil the puris will puff up. Turn over and continue to fry until golden. Drain on kitchen paper.

Wednesday, April 04, 2007

Chocolate Chip Cookies


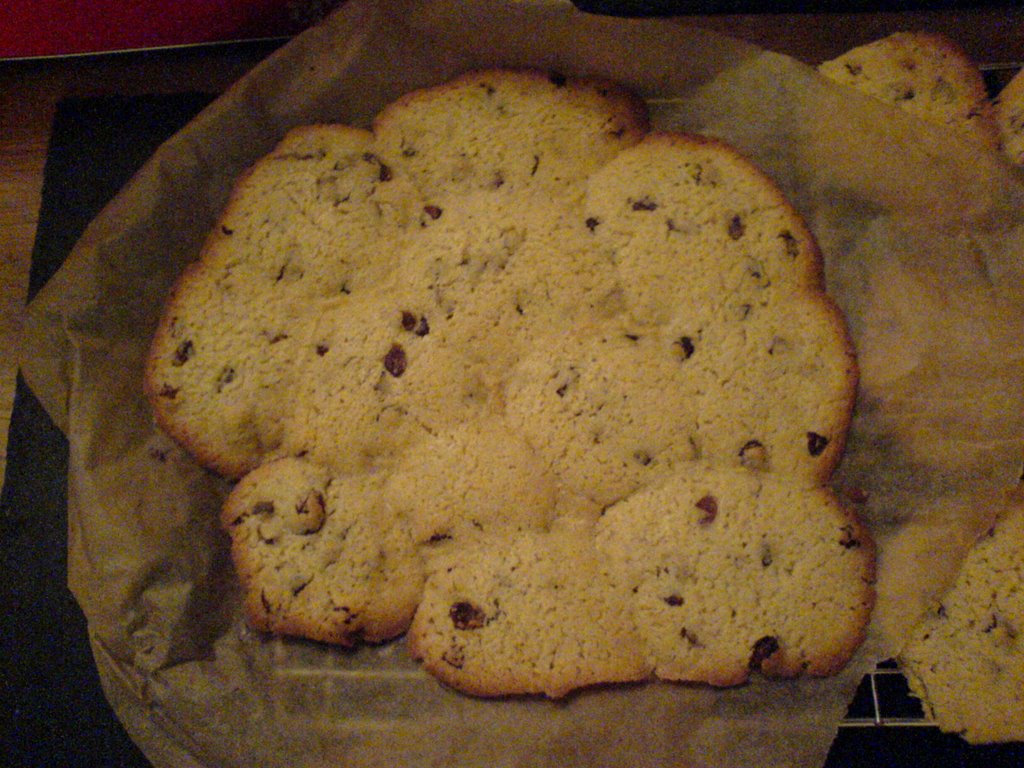
Now it's Easter Hols and I have time off work it gives me the opportunity to get back to baking (or experimenting as I'm sure H2B would like to call it!). Todays baking disaster was cookies. I've made them loads of times before, but this time I didn't leave enough gap between each blob of cookie dough and I ended up with one giant cookie. Thankfully the old workmates I had made them for didn't mind.

Last night was such a cold night, and I had some bread & cream to use up I decided to make bread & butter pudding. Not something I should be eating with my next wedding dress fitting on Tuesday but you can't beat bread & butter pudding piping hot from the oven with a huge dollop of G&B vanilla icecream....heaven.

Bread & Butter pudding (serves 6)
350g white bread (about 1/2 a loaf)
150g butter
ground nutmeg
about 2 handfuls of sultantas/currents/rasins
3 tbsp sugar
3 medium eggs, beaten
100g caster sugar (I use the vanilla caster sugar we made at xmas)
450ml single cream

1) Preheat oven to 180oc, butter bread, cut off crusts and place in deef 20x30cm baking dish. Sprinkle with raisins and nutmeg

2) Lightly whisk eggs, sugar and cream. Pour over bread. Dot with a few extra dollops of butter.

3) Sprinkle with sugar. Bake for 40-50min until risen and golden.

Appologies for the odd formating of this entry, I'm still trying to get used to Blogger!